Showing posts with label Windows Server. Show all posts

Saturday, November 26, 2016

Registering ASP.NET for Office Web Apps Error

 on  with No comments 
In , ,  
Here's a quick and dirty post for something that came up recently in the lab.  I was setting up an Office Web Apps server, and was getting the following error:

Can't create new Office Web Apps farm: The server must be joined to a domain.

Seeing this error message was a bit frustrating to say the least, because the server was indeed joined to a domain.  After a bunch of searching with Google, I finally came across the answer.  While setting up the server, I had installed IIS before .NET, so I needed to register ASP.NET.  The required bits in IIS were already installed, so it was just a matter of registration. This can be done with the following steps:

  • Open an elevated command prompt or PowerShell console.
  • execute the command start Microsoft.NET
  • navigate to c:\windows\Microsoft.NET\Framework\v2.0.50727
  • execute the command asp_regiis.exe /i 
  • execute the command iisreset or restart the server
Other things to check for when getting this error are to ensure that your server really is connected to a domain (and that the server account in AD is not broken) and that you have the correct DNS Server specified in the network settings.
Share:

Wednesday, June 1, 2016

Server 2003 IAS RADIUS Server

 on  with No comments 
In ,  
Since I'm sure many home labbers are still rocking Server 2003, I'll put it up in hopes that someone will still find it useful. This post was originally done a number of years ago when Server 2008R2 was still new and memory was still at a premium on my virtual machine host. I was hoping to save a few MB by sticking with 2003. I'm sure 2000 Server is pretty similar (and even smaller), though I have never set up IAS on that platform.

The first step is to install Internet Authentication Service (referred to as IAS from hereon out). Ensure that you have your Server 2003 installation CD handy. Go to Start, Control Panel, and launch the Add or Remove Programs applet. Along the side of the applet, there will be a button called Add/Remove Windows Components. Launch that. In the Components box, highlight Networking Services and then click on Details. Scroll down until you find Internet Authentication Service and select it. Choose OK, then click Next. That’s it, IAS is now installed and ready to be configured.

Now let’s launch the IAS Control Panel. Depending on the configuration of your server and your preferences, you can go to Start > Administrative Tools > IAS. Once it’s started, you’ll see a window such as the below screenshot. This is where you'll be doing all your RADIUS server configuration.


Next we want to add the clients that will be allowed to authenticate. Right click on RADIUS clients and then select New RADIUS Client. You will get a dialog box that pops up with allows you to enter the information for the client. For Friendly Name, enter a string to identify the device. It will probably be a good idea to enter the hostname of the device, especially if you are going to enter dozens of routers and switches. In IP Address, enter the IP address of the device. You want to enter the IP Address that will be seen in the source address of the packet being received by Windows Server. In the Client-Vendor drop down list, select Cisco. In Shared Secret, enter the RADIUS password to be used with this device. Enter the same password again in Confirm Shared Secret, and you're done. Click OK to complete the configuration. Repeat these steps for each additional device you wish to authenticate to this server.

Next, you’ll want to choose users who will be allowed to authenticate via RADIUS. You can go with existing users, or you can create new users here. It doesn’t matter if you want to use local users or Active Directory users, the process really isn’t that different. You just need to add the users to a group which you'll be using later.

Right click on Remote Access Policies and select New Remote Access Policy. Click next through the welcome screen. You'll now be at the Policy Configuration Method screen. Select Set up a custom policy, give it an appropriate name and click next. You're now at the Policy Conditions window. Click Add. In the Select Attribute window, scroll down to "Windows-Groups" and select Add. You'll now get a window called Select Groups. From this location indicates where you'll be selecting the group from, the local machine or a domain. If you want to use a group on the local machine, this should be the computer name, otherwise it should be the name of the domain. In the large white box below that, enter the name of the group and hit Check Names. If all is well, you will see the group listed in the form "Computer\GroupName." Hit OK. You'll be back at the policy conditions box and your policy conditions will say something to the effect of Windows-Group matches "Computer\Group." Hit next, Grant remote access permission, hit next again and you'll be at the profile window.

Hit Edit Profile. You'll be at the Edit Dial In Profile window seen here. Uncheck all authentication methods except for unencrypted authentication and click apply. Now select the advanced tab. In the box, select Service-Type, and change the value to Login. Click OK, and now remove the Framed-Protocol option. Click Add to add a new option. Scroll down and find Vendor-Specific and click add. Click add and select Cisco. Select Yes, It conforms. Complete the window as follows: Vendor assigned attribute number - 1. Attribute Format - string. Attribute value - shell:priv-lvl=15. This string will be used by IOS to determine a privilege level for the user once authenticated to the device. OK your way back out to the Edit dial-in profile box, which should now appear as follows:

Click OK and then a couple Next's to finish up.

Now back at the IAS window, select Remote Access Policies,right click on your policy, and select Move Up until it is the first policy in the list. You have now completed setting up IAS to serve as a RADIUS server for all of your devices.
Share:

Wednesday, March 30, 2016

Installing NDES on the Issuing CA

 on  with No comments 
In , ,  
The Network Device Enrollment Service (better known as NDES) is a component of Active Directory Certificate Services.  It's based on the industry standard Simple Certificate Enrollment Protocol (SCEP) which is an Internet Draft by the Internet Engineering Task Force (IETF).  SCEP is designed to make digital certificate issuance as simple and scaleable as possible.  SCEP can be used to distribute certificates to network devices such as routers and firewalls, as well as mobile devices such as cellphones.

In this post, we'll go through the installation of NDES on the issuing CA.  There won't be many screenshots this time around since we've already seen pretty much everything installing the Active Directory Certificate Services role on both CAs. Note that I'll be using the domain name of firewallninja.info throughout.  Substitute the name of your domain as appropriate.

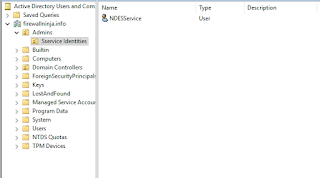
First, we need to add a service account.  On the domain controller, launch Active Directory Users and Computers (ADUC) from the Administrative Tools program group.  On the left side of the screen, you'll see the OU hierarchy for your domain. Right click on firewallnina.info and create a new OU called Admins.  Inside the Admins OU, create another OU called Service Identities.  Right Click on Service Identities and select new and then user.  Give this user the username of NDESService and a firstname of whatever (you have to give the user either a first name or last name in addition to a username), and on the next screen a password that you'll be able to remember. Uncheck User Must Change Password at Next Login and select Password Never Expires. Finish off the wizard to create the user. It will look as follows when you are done.


Now go back to the issuing CA.  Launch Computer Management from the Administrative Tools program group.  Expand out Local Users and Groups, and then Groups on the left side.  Double Click IIS_IUSRS, and then click Add.  In the search box that comes up, enter NDESService, and press OK.  Press OK on the IIS_IUSRS properties, And then close Computer Management.

Now in Server Manager, Select Add Roles and Features. 
  • Hit Next a couple times until you get to the Server Roles screen.  
  • Expand out Active Directory Certificate Services and check the box next to Network Device Enrollment Service. 
  • OK additional pieces of IIS to install.  
  • On the Specify User Account page, click Select User and enter the NDESService user and its password. 
  • On the Specify Registration Authority Information page, give a name for the NDES service (different than that given for the issuing CA) and select a country from the drop down list.  The rest can be left blank.  
  • On the Configure Cryptography screen, choose the settings that you used for the Root CA and Issuing CA.
  • Review the information about IIS and hit next.
  • Review the Confirm Installation Services page and hit next.
  • Install NDES.
NDES has now been installed on the issuing CA and is ready to use.  We've now completed the setup of the issuing CA.


Share:

Saturday, March 19, 2016

Building the Root CA

 on  with No comments 
In , , ,  
In the lab, a single Windows Server running Active Directory and Active Directory Certificate Services.  But if you haven't figured out yet, I am a big fan of overkill and never do anything only to the level of minimum required.  I always like to do everything bigger and better, as there will be additional opportunities to learn that way.  I'm using The 70-640 Self-Paced Training Kit as a guide, one of the two books that I used years ago when I was studying for the MCSA 2008.  I actually liked the Pearson book by Don Poulton better, but the Microsoft Press book is sufficient, even if it is a bit thin in the details.

In a previous post, I created a domain with the name firewallninja.info on a server with Windows Server 2016 Technical Preview 4.  Today we'll continue building out the security lab by adding the first of a 2 tier CA hierarchy, the root CA.  I have previously built a VM with Server 2008R2, configured its hostname and IPv4 settings, and added it to the firewallninja.info domain.  If you need a refresher on adding a new server to your domain, here is a guide for Server 2003 and 2008 and here is a guide for Server 2012R2.  For the root CA, Windows Server 2008R2 Standard, Enterprise or Datacenter Edition can be used.

I selected to go with Server 2008R2 rather than going 2012R2 for both CAs for a couple of reasons.   First, when I had an MSDN account though school years back, I build a large volume of Server 2008R2 VMs and haven't used even a fraction of them yet.  And I probably won't, seeing as most of the labbing I do is on Server 2012R2 at this point.  This is a root CA that is going to be powered down and I'll probably never see it again, so why not.  Second, there are a few slight differences when working with 2008R2 and 2012R2, so I wanted to run through it on both for the sake of exposure.  Server 2008R2 is still out there, probably still in higher numbers than 2012R2 at this point.  I don't recall the root CA requiring any specific version of Windows Server to use the latest/greatest features on the issuing CA, so Server 2000 or 2003, or even Linux with OpenSSL may be sufficient as well.

So let's get started on the root CA.  Log into the server with an administrator account.  A local admin account is sufficient, but you can use a domain admin account as well.  Let the Server Manager load as that's the tool we'll be using.


On the left pane of Server Manager, find Roles and click on it.  On my server, nothing has been installed yet, so the box is blank and says 0 of 17.   Click on Add roles on the right.


Next, select Active Directory Certificate Services.  If you want to add any other server roles, you can select them as well.


Once you have selected Active Directory Certificate Services, you'll see the box change to include options for the role, or roles, that you have selected.


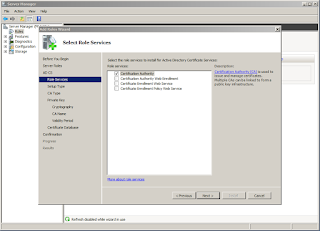
For this server, I'm only going to install Certificate Authority.  The others will be used on the issuing CA later.


Next, I'm going to select Standalone.  The difference is beyond the scope of this post, but you can read more about this at Technet, if you're interested.


Here I'm going to select Root CA.


Next, I'm going to have the server create a new private key.  Since this is a new setup, I don't have an existing key to give it.  If you were replacing a server that died and are fortunate enough to have the private key from that server, you can import it here.  Another reason why you would import a certificate here would be if you purchased one from a 3rd party CA such as GoDaddy.


I'm going to keep the default 2048 bit key, and I'm going to use SHA256.  Modern web browsers are either flat out dropping support for SHA1, or making it difficult to enable, so you should be thinking about that when configuring cryptography in your CAs.  The last option on the page, "Allow administrator interaction when the private key is accessed by the CA" is an additional security control that requires an admin user to interact with the CA.


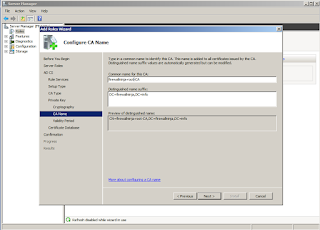
Next, we'll choose the distinguished name for this CA.  This is not the same as the server's hostname, but can be.


I'm changing the lifetime of the certificate to 20 years.  This is a lab, and I don't want to have to worry about my cert expiring and then finding that the root CA that's been offline for 5 years doesn't want to boot up.  With any luck, I won't still be using this domain in 20 years.


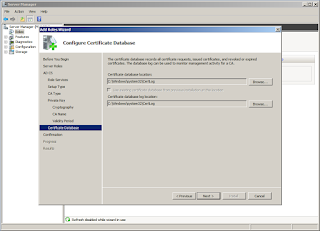
Give the location on the filesystem for the CA data.  Like the AD data, the defaults are fine in the lab, but you'll want to spread the love around multiple spindles if possible in production.


Review your choices here, or don't, and then click Install.


Go grab a cup of coffee and/or a snack. This takes a few minutes, especially in a VM.


Finally, everything is installed and we're ready to go.


Back at the Server Manager, you can view the results of the installation.  For instance, in the events, you should see event 103 which indicates that your CA name has been added to the Certificate Authorities container in Active Directory.

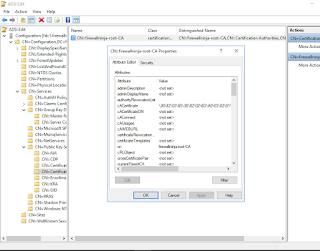
After the next group policy cycle, you can move on to the issuing CA.  Now if we go back to the domain controller and dig down in ADSIEdit, we can see the root CA in the Active Directory schema.  The root CA can go offline once the issuing CA has its cert.


With the root server in AD and powered down, we will only ever need it again at such time that we need to generate a new root certificate.  Next up, the issuing CA.
Share:

Saturday, January 16, 2016

Building the Domain

 on  with No comments 
In , ,  
Edit: This post has been updated with a new walkthrough as I changed my mind on a few things.   Most notably, I'll be working with a new isolated domain rather than a child domain off of my production domain.

In this post, I'll go through the steps of building an Active Directory domain.  I'll assume you already have Windows Server installed, a host name set and a static IP address assigned to the network interface.  Here, I'm using Windows Server 2016 Technical Preview 4, just because I want to kick the tires on the lastest bits.  The process should be pretty much the same in any other Technical Preview build or Server 2012/2012R2 but has changed vastly from Windows Server 2008R2 and earlier.  Server Manager is vastly different, and the dcpromo command is only there to process an answer file at this point, everything is done via Server Manager.

This is going to be a long post with a lot of screen shots.

When you log into the server, you'll see Server Manager pop up.  In the main field, you'll see common steps numbered from 1 - 5. We're looking for number 2, Add roles and features.


Next, it asks if you want to perform a role-based/feature-based installation, or a remote desktop services installation. Leave the default selected.


Next, you will be asked to select which server you wish to install roles or features on.  One of the nice additions to Server 2012 is the ability to manage multiple servers from a common instance of Server Manger. You can add additional servers to be managed in, and from here install roles and features on other servers in your environment. And if you install the latest Windows Management Framework for Server 2008 or Server 2008R2, you can manage those (although more limited) from Server 2012/2012R2 as well.

In this case, we're don't have a domain set up yet, so the local host should be the only server appearing on the list. Click Next.


Next, you'll want to tick the box next to Active Directory Domain Services.  A box will then pop up labeled Add Roles and Features wizard that informs you of any additional prerequisite roles and features for what you just selected for installation.  Click Add Feature to install these additional options.

Once you have Active Directory selected, do the same for DNS Server.  DNS is an integral part of Active Directory and simply cannot be left out. I've read conflicting reports on whether or not non-Windows DNS Servers can be used, but I've never gotten it working with recent versions of Windows Server if it is indeed still possible.  I'm not really studying advanced Windows Server topics, so I never kept at it.  Has anyone gotten it to work?

Select any other roles you care to install as well.

Here you can select various features to install if your server isn't going to be limited to a domain controller, but I'm not adding anything that hasn't already been automatically selected so I'm just clicking Next again.


Next you'll see this informational box on ADDS.  Feel free to read it, or don't, your call. Click Next.


Another similar box for DNS.  Again, read it or don't and click next.


Here is the final confirmation of what you've chosen to install, and a checkbox at the top selecting whether or not you want the server to reboot if required once the installation has completed, if necessary. Obviously for a production machine that is performing other tasks, you'll want to hold off until a scheduled maintenance window, but in the lab go ahead and let it reboot. Click Install when you're ready to let it begin.  Interestingly enough, this server didn't reboot after installing the Active Directory bits. 

One you let it begin, it's going to take some time to complete, especially if this is in a virtual machine so go ahead and grab a sandwich.


Once the roles and features have finished installing, note the yellow exclamation mark at the top of Server Manger trying to get your attention. If you click that, you'll see the following box indicating that your server is ready to be promoted to a domain controller. Click on "Promote this server to a domain controller" to begin.

The first thing that comes up will ask you about the environment. I'm building a new domain here and naming it firewallninja.info (clever, eh?), so I selected Add a new forest and entered the name.  Fill in the boxes appropriately for you, and then click next.  A bit of a wait here, and a command prompt comes and goes without warning. 


Next it will ask you some questions regarding this domain controller. The first is the FFL and DFL of the domain. Since this is a lab domain, I'm going to select the highest avaiable to ensure I have all the latest/greatest bits to experiment with.  We need to check off DNS and Global Catalog since its the first domain controller in the domain.  Finally, give it a DSRM password that you'll be able to remember. Or not, because in the lab you'll probably be better off just rolling back to a snapshot of this server than trying to fix an problem of the magnitude necessary to use Directory Service Restore Mode.


Next is the DNS Options. Nothing to change here as it is the first domain controller for the domain.


Next is the Additional Options, which consists of nothing more than the NetBIOS domain name. Whatever comes up as the default is fine because who uses NetBIOS anymore?


Next is the directory paths for various parts of Active Directory. Spread the love around to multiple spindels in production, but the defaults are fine in the lab.


Finally we have a summary of all the options selected. If this were a domain controller for an existing domain, you could click view script to get a PowerShell script to run on any additional servers you want to promote to domain controllers.  Click Next again.


Prerequisites will be checked here. There shouldn't be anything stopping you from proceeding at this point, but it will tell you if there is. The one warning is letting you know about a default cryptography option that is not best practice, but chosen for compatibility reasons.  This can be fixed in group policy later if you care to lock this setting down.

Click Install to begin the promotion.


The process will run for some time, and the server will reboot once it's done. The local administrator will be converted to the domain administrator once the process has completed.  There are no local user accounts on a domain controller.


Share: