
In a previous post, I created a domain with the name firewallninja.info on a server with Windows Server 2016 Technical Preview 4. Today we'll continue building out the security lab by adding the first of a 2 tier CA hierarchy, the root CA. I have previously built a VM with Server 2008R2, configured its hostname and IPv4 settings, and added it to the firewallninja.info domain. If you need a refresher on adding a new server to your domain, here is a guide for Server 2003 and 2008 and here is a guide for Server 2012R2. For the root CA, Windows Server 2008R2 Standard, Enterprise or Datacenter Edition can be used.
I selected to go with Server 2008R2 rather than going 2012R2 for both CAs for a couple of reasons. First, when I had an MSDN account though school years back, I build a large volume of Server 2008R2 VMs and haven't used even a fraction of them yet. And I probably won't, seeing as most of the labbing I do is on Server 2012R2 at this point. This is a root CA that is going to be powered down and I'll probably never see it again, so why not. Second, there are a few slight differences when working with 2008R2 and 2012R2, so I wanted to run through it on both for the sake of exposure. Server 2008R2 is still out there, probably still in higher numbers than 2012R2 at this point. I don't recall the root CA requiring any specific version of Windows Server to use the latest/greatest features on the issuing CA, so Server 2000 or 2003, or even Linux with OpenSSL may be sufficient as well.
So let's get started on the root CA. Log into the server with an administrator account. A local admin account is sufficient, but you can use a domain admin account as well. Let the Server Manager load as that's the tool we'll be using.

On the left pane of Server Manager, find Roles and click on it. On my server, nothing has been installed yet, so the box is blank and says 0 of 17. Click on Add roles on the right.

Next, select Active Directory Certificate Services. If you want to add any other server roles, you can select them as well.

Once you have selected Active Directory Certificate Services, you'll see the box change to include options for the role, or roles, that you have selected.

For this server, I'm only going to install Certificate Authority. The others will be used on the issuing CA later.

Next, I'm going to select Standalone. The difference is beyond the scope of this post, but you can read more about this at Technet, if you're interested.

Here I'm going to select Root CA.

Next, I'm going to have the server create a new private key. Since this is a new setup, I don't have an existing key to give it. If you were replacing a server that died and are fortunate enough to have the private key from that server, you can import it here. Another reason why you would import a certificate here would be if you purchased one from a 3rd party CA such as GoDaddy.

I'm going to keep the default 2048 bit key, and I'm going to use SHA256. Modern web browsers are either flat out dropping support for SHA1, or making it difficult to enable, so you should be thinking about that when configuring cryptography in your CAs. The last option on the page, "Allow administrator interaction when the private key is accessed by the CA" is an additional security control that requires an admin user to interact with the CA.

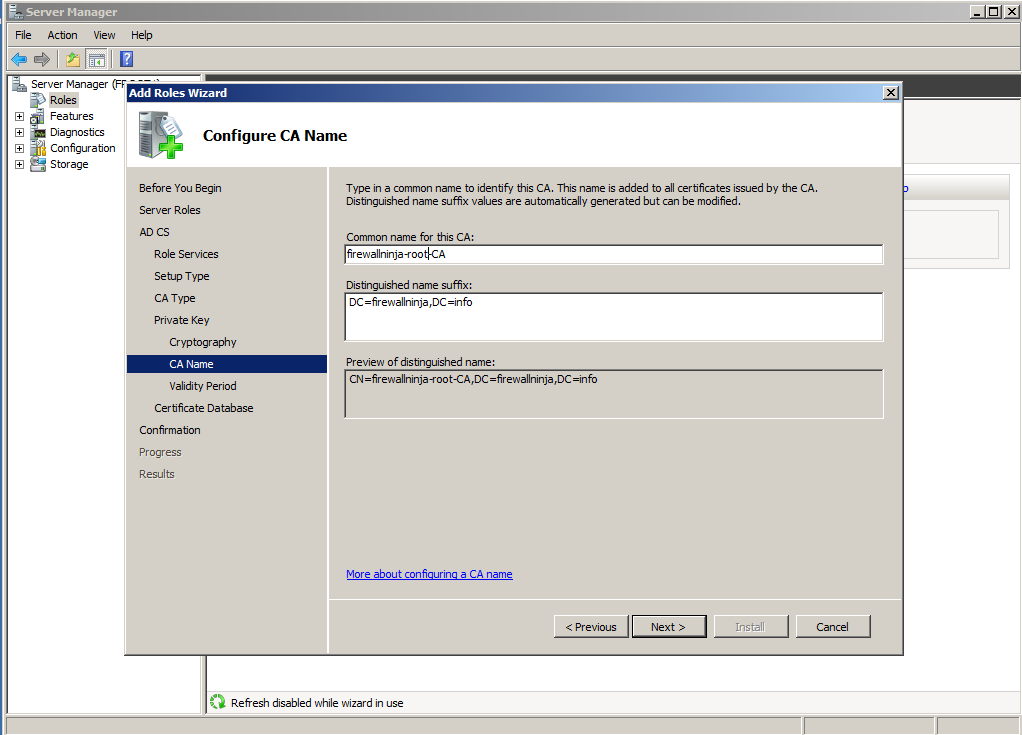
Next, we'll choose the distinguished name for this CA. This is not the same as the server's hostname, but can be.
I'm changing the lifetime of the certificate to 20 years. This is a lab, and I don't want to have to worry about my cert expiring and then finding that the root CA that's been offline for 5 years doesn't want to boot up. With any luck, I won't still be using this domain in 20 years.

Give the location on the filesystem for the CA data. Like the AD data, the defaults are fine in the lab, but you'll want to spread the love around multiple spindles if possible in production.

Review your choices here, or don't, and then click Install.

Go grab a cup of coffee and/or a snack. This takes a few minutes, especially in a VM.

Finally, everything is installed and we're ready to go.

Back at the Server Manager, you can view the results of the installation. For instance, in the events, you should see event 103 which indicates that your CA name has been added to the Certificate Authorities container in Active Directory.
After the next group policy cycle, you can move on to the issuing CA. Now if we go back to the domain controller and dig down in ADSIEdit, we can see the root CA in the Active Directory schema. The root CA can go offline once the issuing CA has its cert.

With the root server in AD and powered down, we will only ever need it again at such time that we need to generate a new root certificate. Next up, the issuing CA.


0 comments:
Post a Comment
Discuss this post!