Saturday, December 24, 2016

My Fan Club

 on  with No comments 
In , ,  
As I've mentioned a few times in the past, I act as an admin for one of the largest, if not the largest, Facebook groups dedicated to CCNA study.  You can find that group right here, or through the Facebook button in the top right corner of any page on this blog.  The group has a few other admins spread out through the world (so that our eyes would be on the page at different times of the day, ideally) and we run the group in accordance to our own moral compass, which for the most part aligns pretty well amongst ourselves and past admins.

Of course, the rules that we've set for the group don't sit well with some people.  If you're into something that doesn't jive with the rules, just simply don't discuss it in the group.  It's pretty simple, right?  Well for some it isn't that easy.  And since I encourage feedback from the community of users, I get it.  Here I've collected a few of my favorites.  There have been others, but many of them blocked me not long after and Facebook knocked it off of my messages before I could get a screenshot.  Warning, the language in these screenshots is a bit graphic.

This first satisfied customer of our services was removed for discussing braindumps and gets right to the point.


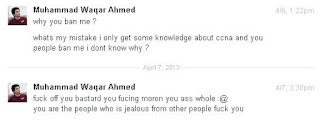
User number two was removed for the same reason.  Apparently cheating on exams means obtaining knowledge, and I'm just jealous somehow.   Interesting take.


User number three is my personal favorite.  I think he's asking me to create a group full of porn, and then show it to him?  I didn't realize that porn was so difficult to find.  I know that Netflix is taking over as the king of Internet traffic, but recent numbers show porn is still well over 30% of all traffic.


User number four was apparently upset that the free service we're providing him didn't get him an answer quickly enough for his satisfaction.  So he asked a few more times.  I believe this is the fourth time he asked, a couple times as a top level post, and a couple other times attempting to thread-jack another discussion.  Anyway, I did answer one of his other posts but he chose to ignore that and post again.  Needless to say, he won't have to worry about us getting back to him too slowly anymore.


Finally, this last one didn't come from the CCNA group, it came as a private message to the Free CCNA Workbook Facebook page, which I am also an admin for.  No commentary necessary, I think it speaks for itself.  Apparently when I took the screenshot of this one, I was feeling generous and omitted the name of this class act.  I wonder what he would have thought if I tracked down his instructor and showed them this?


And this is far from all of the nonsense I've gotten over the years, it's just the ones that amused me to the point of taking a screenshot.  That is not to say that it's all negative feedback, but that's primarily the thanks you get for a well maintained group.  The group has no spam, no flame wars, nothing violating the rules except for the very brief time it takes an admin to see and kill the post.  That is, except in my private inbox.  That's full of it.
Share:

Saturday, November 26, 2016

Registering ASP.NET for Office Web Apps Error

 on  with No comments 
In , ,  
Here's a quick and dirty post for something that came up recently in the lab.  I was setting up an Office Web Apps server, and was getting the following error:

Can't create new Office Web Apps farm: The server must be joined to a domain.

Seeing this error message was a bit frustrating to say the least, because the server was indeed joined to a domain.  After a bunch of searching with Google, I finally came across the answer.  While setting up the server, I had installed IIS before .NET, so I needed to register ASP.NET.  The required bits in IIS were already installed, so it was just a matter of registration. This can be done with the following steps:

  • Open an elevated command prompt or PowerShell console.
  • execute the command start Microsoft.NET
  • navigate to c:\windows\Microsoft.NET\Framework\v2.0.50727
  • execute the command asp_regiis.exe /i 
  • execute the command iisreset or restart the server
Other things to check for when getting this error are to ensure that your server really is connected to a domain (and that the server account in AD is not broken) and that you have the correct DNS Server specified in the network settings.
Share:

Saturday, November 12, 2016

SENSS Passed

 on  with No comments 
In ,  
Just a short post for this week, as I've done recently.  This exam has completely consumed my time lately.  Because I had yesterday off, I scheduled my second attempt at the SENSS and nailed it this time with a score of 910.  Exams are a lot easier when you know what you need to know, aren't they?  This isn't a knock against Cisco's exam topics, I just didn't have a good idea of just how deep I needed to know certain things that didn't seem like they'd be covered as heavily which lead me to spend a lot of time on things that weren't really covered very much.  It was my first failed Cisco exam, and quite a humbling experience. Either way now I have a much better idea idea of what I need to do moving forward in the CCNP Security.

Next up, I don't know yet.  I plan to take a couple days to recover from that experience and give some thought to which exam I want to tackle next.  While the SIMOS looks like it'll be a lot more fun as it's very heavy in cryptography and VPNs, the SISAS may be more practical as ISE reared it's head multiple times already in the SENSS, and I doubt it won't be in the other exams as well. Besides that, the SISAS is the only exam with a certification guide, so getting to see a little bit of structure in exam preparation may be of use.

Either way, it's not going to be the SITCS this time.  There's no way I'll be able to knock out v1.0 before December 16, and I'd prefer to wait a little bit and let the community hash out exactly what v1.5 is before attempting it.  There was a lot of butt-hurt early on for all 4 of these exams from the early attempts and I'd hate to join the ranks.

Also in the near future will be the CISSP, which is the capstone of my Masters Degree, and the Upgrading Your Skills to MCSA Windows Server 2016 exam.  I haven't decided when I'll mix those two in yet either.  So for now I'll just be kicking the tires on Server 2016 and starting to tinker with ISE.  I've got a few SENSS related posts still in very rough form, so I'll probably get those presentable and post them here and there as well.
Share:

Saturday, October 8, 2016

CCNA Question of the Week 4

 on  with No comments 
In , ,  
This week, we had an open ended question that covers a lot of areas.  This is a take on a question that was asked during the phone screening for my first I.T. job.  As with all questions in this series, do not make assumptions, and do not answer a question that was not asked. Just answer the question as completely as your knowledge allows.

Your computer was just started and you just logged in and then loaded your favorite web browser.  No other actions have been taken on this computer and no other programs have been launched.  You type www.yahoo.com into the URL bar of the browser and press Enter.  Between now and when the page finishes loading, describe everything that happens in order for that page to load.

Share:

Saturday, September 10, 2016

The Official CCNA Group Rules

 on  with No comments 
In , ,  
Group Rules:
1.This is a network for the network associate. All legitimate things CCNA related, as well as most other I.T. topics may be discussed here.
2.Things that may not be discussed here include (but is not limited to): Brain-dumps, any other form of copyright infringement, any illegal activity, spam, politics, and personal attacks. It doesn’t matter if it’s legal where you live, Facebook is an American website. If you like a post, that is considered the same as if you posted it yourself.
3.If certguard.com says it’s a dump, then it’s a dump and this isn’t open to negotiation.
4.Do not post homework questions with the expectation that the answers will just be provided. We are willing to help if you don’t understand something, but this group isn’t here to just do it for you.
5.The admins, and only the admins, will decide and enforce the rules.
6.Not knowing is no excuse. You shouldn’t be posting anywhere on the Internet if you don’t know the rules. Violators of any rule are subject to immediate banning.
7. No new accounts. No offense to anyone, it's just that accounts newer than 30 days are where the majority of spam comes from. If you get turned away for this, feel free to try again later.
8. No one word answers. If you can't explain why the answer is d, then you don't need to be the 15th person saying d. Contribute something meaningful to the conversation.
9. Don't try to add people to the group. Nobody gets in without an admin's approval, and I do not approve anyone who did not join on their own.


Group FAQ:
http://www.firewallninja.info/2016/07/the-official-ccna-group-faq.html
Share:

Wednesday, August 31, 2016

CCNA Question of the Week 2

 on  with No comments 
In , ,  
In the following image, you'll see a network topology.  In this topology, the routers are running the RIP routing protocol.  As is traditional with these questions, I'm going to strip out all the irrelevant information.  We're not going to see any router configuration, IP addressing, or anything else that would distract from the question at hand.  The key thing we're going to focus on here is that there are 20 routers.  First, we'll start with a couple assumptions:
  • The RIP routing protocol is configured correctly on every router.  
  • Nothing in the routers configurations differ except for IP addresses and networks in the routing protocol.
  • The IP addressing scheme is correctly subnetted, and the routers are addressed correctly on every interface.
So this week's question is, can the RIP protocol function correctly in this topology?  And for a couple follow up questions:  Why or why not?  Does it make a difference if we're running RIPv1 or RIPv2?


The first thing that probably comes to mind is that the RIP protocol has a maximum hop count.  Most CCNA students go here first when something of this nature comes up.   Now let's consider the difference between hop count, and the number of routers in the topology.  The hop count refers to the number of hops between two routers.  It says nothing about the number of routers in the topology.  

So Let's look at the two routers that are furthest apart, R1 and R20.  In this particular topology, there is no path from R1 to R20 that is more than 7 hops.  And if there a path that exceeded the maximum hop count, it would be ignored by the routing protocol, not having any effect on a different route that didn't exceed 15 hops.  

So the answer to the question is yes, this is a valid RIP topology.  Now two routers exceed 15 hops apart, so there is no part of the topology that is unreachable by any other portion of the topology.  PC1 can reach PC2.

And for the final follow up question, it doesn't matter if we're running RIPv1 or RIPv2.  Neither version of RIP will balk at a hop count of 7.
Share:

Thursday, August 25, 2016

CCNA Question of the Week 1

 on  with No comments 
In , ,  
Group member Donovan Bone posted this question in a discussion, and I thought that it would be a great "Question of the Week" for the group.  So a new thread was started for just it, and a lot of members attempted to answer the question. I didn't expect the majority to get it right, but only one got it right in the three hours I watched the replies.  Not surprisingly, the one person who answered correctly is the only one who actually labbed it up.  So here is the question.

Share:

Wednesday, July 20, 2016

The Official CCNA Group FAQ

 on  with No comments 
In , ,  
I've been one of the admins of the group for a few years now, and there's a handful of questions that I see repeatedly posted.  I'm talking about the things that somebody asks at least once a week in the group.  So I've started compiling this FAQ for the group that can be posted as a response to any question that falls within this list.  As with many posts relating to the Facebook group, this will be a living document and material will be added, removed or modified as necessary.

If you haven't already read my post on how to ask better questions, maybe take a minute to look at that as well.
Share:

Saturday, July 16, 2016

I'm New, What Should I be Reading?

 on  with No comments 
In ,  
In the CCNA group, an often posted question is "what books should I be reading?" or the less inspired "What is the best networking book?"  Well, it's never quite that simple.  What are you looking to learn?  Do you want to become proficient in networking in general, or are you looking to become proficient in Cisco related networking?  Yes, there is a difference.  Do you want to really learn how things work, or do you want to just pass your next certification exam? Again, there is indeed a difference.

I wrote out a long post replying to this recently, and thought I'd save the response here and elaborate a little more.  A little because it's a good topic, and a lot because I'm lazy and will just link this rather than answer again in the future.  If you want to hear the simple answer, go with the dozens of knuckleheads screaming out that Todd Lammle is all you need.  Just ignore their misspelling of his name.  But if you want to actually learn networking, then continue reading.
Share:

Wednesday, July 13, 2016

Netflow Collectors

 on  with No comments 
In , ,  
One of the big topics currently in Cisco's security track is Netflow.  According to Cisco, "NetFlow provides valuable information about network users and applications, peak usage times, and traffic routing."  With all of it's known, and yet to be discovered uses, it's no doubt that NetFlow will continue to be a big part of Cisco's security exams for the foreseeable future, as well as potentially finding it's way into other tracks if it's not already there.
Share:

Saturday, July 9, 2016

FreeCCNAWorkbook.com in Packet Tracer, Part 3

 on  with No comments 
In , ,  
In two previous blog posts, which can be found here and here, I started going through the labs on the Free CCNA Workbook website and attempting to perform the labs in Packet Tracer.  My focus lately has been more on my own studies with my first attempt at the SENSS exam scheduled for next month, but with Cisco finally releasing Packet Tracer to the world (you no longer need to be a Cisco Network Academy student to legally download a copy), I've been wanting to revisit this topic.  So in this post I'm going to move on to Section 5, Configuring Wide Area Network Links.
Share:

Wednesday, June 29, 2016

Why is Everyone Upset with RadioShack?

 on  with No comments 
In , , ,  
The following is a position paper that I wrote in April of 2015 To set the timeline, this was merely weeks if not days after RadioShack announced that it was selling it's customer information database, which came shortly after it's bankruptcy. You know, that database that was assembled with the information demanded of you at the register every time you stopped in to grab a pack of batteries. This is in spite of their policy that they would never sell that information without your consent (emphasis mine).
Share:

Wednesday, June 22, 2016

Symmetric Traffic and IPS

 on  with No comments 
In ,  
A well known problem for network and security professionals in the enterprise is asymmetric routing.  At it's simplest, this is where traffic flows outbound through Router A, while the return traffic returns through Router B, or through both Routers A and B.   If you're using a reflexive ACL, for example, this will lead to some, if not all of the return traffic being blocked as it attempts to return through Router B.  This is due to Router A having a record of the outbound traffic while Router B does not.  Riverbed breaks this down into several sub-categories such as complete asymmetry, server-side asymmetry, client-side asymmetry, and multi-SYN retransmit.  But for our purposes here, it's all asymmetric, and it's all a bad thing.  While some firewalls are able to share state to avoid this situation, not all do.  And Cisco Routers running IOS do not.

While asymmetric routing is known to be a problem at the network edge, it can be a problem for security professionals internally as well.  And the larger the network is, the more likely asymmetric traffic is to occur at some level.  When you deploy an IPS sensor in the network, it must be able to see all traffic in both directions for maximum effectiveness.  When an IPS sensor is able to see all the traffic involved in a particular session, you get better threat detection, reduced susceptibility to IPS evasion techniques, and less susceptibility to false-positives and false-negatives. 

While it cannot be completely avoided at the enterprise edge, the good news is that internally, steps can be taken to reduce if not eliminate the effects of asymmetric routing.  So good network design is a must to get the maximum effectiveness of an IPS deployment, particularly if there are going to be multiple sensors along a given traffic flow.

There's a few options to ensure symmetric traffic flows, or to mitigate the effect of asymmetric traffic flows including:

  • Duplicate traffic across multiple IPS sensors to ensure each sensor can see all applicable data.  In addition to the challenges presented in getting all the relevant data to each IPS, we also have a greater likelihood of overloading IPS sensors with traffic, which will result in packets being dropped.
  • Integration of an IPS switch.  This is reducing traffic down to a single switch.  While it is better from an IPS standpoint, it's introducing a single point of failure into the network.
  • Correctly configuring spanning tree parameters to ensure symmetrical paths across Layer 2 areas.
  • Routing manipulation with techniques such as PBR. This is a cost effective solution as it involves only configuration changes rather than additional hardware.  But it adds complexity to the network in addition to requiring cooperation between security and networking. 
  • Sticky load-balancing utilizing technology such Cisco's ACE module or Riverbed's Asymmetric Routing Detection to better reduce the chances of asymmetric routing.
  • In cases of HSRP induced asymmetry, utilize EEM and EOT in order to change the paths of HSRP related routes dynamically.
  • Configuring firewalls as active/standby pairs rather than active/active pairs.
But as you can see, many of these techniques involve taking redundant data paths out of the equation, and therefore reducing the amount of overall usable bandwidth across the network.  Others involve sending more data to or through each IPS unit, increasing the burden on each unit and increasing the likelihood of dropped packets.  So there is obviously a balancing act between performance and visibility.
Share:

Wednesday, June 15, 2016

The Accuracy of Sampled Netflow

 on  with No comments 
In , ,  
To alleviate the fear of overburdening the CPU due to the collection of NetFlow statistics, Cisco gives us the option of using Sampled NetFlow. Sampled NetFlow allows you to sample 1 out of 10 packets, 1 out of 100 packets, or however much of a subset of the total number of packets. The theory is that with a good sample, the traffic will still be indicative of what is flowing through the router. If 10% of the total amount of packets following through the router is DNS queries, for example, then approximately 10% of the total amount of packets in the sample will also be DNS queries, and so on.

The reason that this is necessary is because of the way that a router handles traffic when collecting NetFlow statistics. In order to process a packet in order to collect NetFlow statistics, that packet has to be processed by the CPU. When sampling is enabled, the packets that are not part of the sample are switched faster because they will not require the additional processing required.

NetFlow sampling is enabled on supported IOS platforms with just a few commands.

ip route-cache flow sampled
ip flow-sampling-mode packet-interval 100

NetFlow sampling can be monitored with the show ip flow sampling command.

So as you can see, NetFlow sampling is simple to configure and monitor. It only takes a couple commands. But the question now needs to be asked, how indicative of the total network traffic is the sample? In other words, if I’m seeing 10% of all traffic being DNS queries in my sample, is 10% of the total traffic flowing through this router really DNS queries? Or is there some significant level of error in the sampling? In Cisco documentation and Certification Exam Guides, it is admitted that the sample will never be 100% accurate, but that it should usually be pretty close. They’ll also mention that you should obviously check the accuracy periodically.

Recently, I came across an academic article talking about the accuracy of NetFlow sampling. In the article, they collect data over time with a 1 in 250 packet NetFlow sample and compared it to a raw traffic sniff utilizing tcpdump. Shown below is Figure 8 from the article, which summarizes their findings. The red dotted line shows real time data of traffic flowing through the router, while the solid blue line shows real time data of their 1 in 250 NetFlow sample.

The article states that "In Figure 8 the cumulative empirical probability is plotted with its relative error. It indicates that the performance of systematic and static random sampling is not distinguishable in practice. We believe it is true in most of backbone links where the degree of multiplexing of flows is high."  In other words, the sample is really indistinguishable from the full data set.  Equally of importance, they found that the processing overhead of NetFlow sampling to be insignificant.  Further accuracy of their collection methodologies is demonstrated by SNMP byte count data strongly correlating with NetFlow byte count data.  There's a lot of statistics and graphs in the article if you're into that sort of thing.

Conversely, in another academic article, the researchers found their sampling to be significantly less accurate.  They stated that "Our experimental results allow us to come to the conclusion that: (i) our traffic classification method can achieve similar accuracy than previous packet-based techniques, but using only the limited set of features provided by NetFlow, and (ii) the impact of packet sampling on the classification accuracy of supervised learning methods is severe."  They discuss a training process which gets their accuracy to 85% for a 1/100 sampling.  Good enough for most use cases, but still too manual and still still a far cry from the results of the first study.

So where do we stand with Sampled NetFlow accuracy?  One study says it's pretty accurate, and the other says not so much.  So the jury is still out, and we're back to Cisco's recommendation that you should be testing the accuracy to determine if it is good enough for your use case.  Like the team in the first article, you can easily use a network tap or SPAN port to compare what is actually coming out of a router interface with the NetFlow sample estimating what is coming out of that router interface.  Don't just assume.
Share:

Wednesday, June 8, 2016

IOS Zone Based Firewall

 on  with No comments 
In , ,  
One of the most commonly covered security features when it comes to Cisco security is the ZBF.  It wouldn't be much of a network security blog without at least one post on this topic, so here's my take.

With IOS version 12.4(6)T, Cisco introduced the Zone Based Firewall (ZBF), sometimes referred to as the Zone Policy Based Firewall.  With this, the Classic IOS Firewall or Context-Based Access Control (CBAC), available since IOS version 11.2, is now deprecated. Nearly all of the features of the Classic IOS Firewall are implemented in ZBF as well as wide range of new features. In addition to the new features available in ZBF, it is also said to improve firewall performance over CBAC for most inspection activities.  I've seen it stated in some places that if you attempt to inter-mingle CBAC configuration commands with your ZBF, it MIGHT work, however most documentation states that it wont.  So I wouldn't risk it.  Choose one or the other.
Share:

Wednesday, June 1, 2016

Server 2003 IAS RADIUS Server

 on  with No comments 
In ,  
Since I'm sure many home labbers are still rocking Server 2003, I'll put it up in hopes that someone will still find it useful. This post was originally done a number of years ago when Server 2008R2 was still new and memory was still at a premium on my virtual machine host. I was hoping to save a few MB by sticking with 2003. I'm sure 2000 Server is pretty similar (and even smaller), though I have never set up IAS on that platform.

The first step is to install Internet Authentication Service (referred to as IAS from hereon out). Ensure that you have your Server 2003 installation CD handy. Go to Start, Control Panel, and launch the Add or Remove Programs applet. Along the side of the applet, there will be a button called Add/Remove Windows Components. Launch that. In the Components box, highlight Networking Services and then click on Details. Scroll down until you find Internet Authentication Service and select it. Choose OK, then click Next. That’s it, IAS is now installed and ready to be configured.

Now let’s launch the IAS Control Panel. Depending on the configuration of your server and your preferences, you can go to Start > Administrative Tools > IAS. Once it’s started, you’ll see a window such as the below screenshot. This is where you'll be doing all your RADIUS server configuration.


Next we want to add the clients that will be allowed to authenticate. Right click on RADIUS clients and then select New RADIUS Client. You will get a dialog box that pops up with allows you to enter the information for the client. For Friendly Name, enter a string to identify the device. It will probably be a good idea to enter the hostname of the device, especially if you are going to enter dozens of routers and switches. In IP Address, enter the IP address of the device. You want to enter the IP Address that will be seen in the source address of the packet being received by Windows Server. In the Client-Vendor drop down list, select Cisco. In Shared Secret, enter the RADIUS password to be used with this device. Enter the same password again in Confirm Shared Secret, and you're done. Click OK to complete the configuration. Repeat these steps for each additional device you wish to authenticate to this server.

Next, you’ll want to choose users who will be allowed to authenticate via RADIUS. You can go with existing users, or you can create new users here. It doesn’t matter if you want to use local users or Active Directory users, the process really isn’t that different. You just need to add the users to a group which you'll be using later.

Right click on Remote Access Policies and select New Remote Access Policy. Click next through the welcome screen. You'll now be at the Policy Configuration Method screen. Select Set up a custom policy, give it an appropriate name and click next. You're now at the Policy Conditions window. Click Add. In the Select Attribute window, scroll down to "Windows-Groups" and select Add. You'll now get a window called Select Groups. From this location indicates where you'll be selecting the group from, the local machine or a domain. If you want to use a group on the local machine, this should be the computer name, otherwise it should be the name of the domain. In the large white box below that, enter the name of the group and hit Check Names. If all is well, you will see the group listed in the form "Computer\GroupName." Hit OK. You'll be back at the policy conditions box and your policy conditions will say something to the effect of Windows-Group matches "Computer\Group." Hit next, Grant remote access permission, hit next again and you'll be at the profile window.

Hit Edit Profile. You'll be at the Edit Dial In Profile window seen here. Uncheck all authentication methods except for unencrypted authentication and click apply. Now select the advanced tab. In the box, select Service-Type, and change the value to Login. Click OK, and now remove the Framed-Protocol option. Click Add to add a new option. Scroll down and find Vendor-Specific and click add. Click add and select Cisco. Select Yes, It conforms. Complete the window as follows: Vendor assigned attribute number - 1. Attribute Format - string. Attribute value - shell:priv-lvl=15. This string will be used by IOS to determine a privilege level for the user once authenticated to the device. OK your way back out to the Edit dial-in profile box, which should now appear as follows:

Click OK and then a couple Next's to finish up.

Now back at the IAS window, select Remote Access Policies,right click on your policy, and select Move Up until it is the first policy in the list. You have now completed setting up IAS to serve as a RADIUS server for all of your devices.
Share:

Wednesday, May 25, 2016

ACLs by Country

 on  with 1 comment 
In , ,  
Have you ever wanted to create an ACL by country?  There's a number of different ways you can go about it.  Certain models of firewalls have this functionality built in.  IOS based routers and ASA firewalls have no such capability, so we'll have to do this a bit more manually.  I'll present two methods.

The first method is detailed here.  In this post, wget goes out to the Internet and grabs the necessary data from the applicable RIR.  Some custom Perl code pulls out the subnets associated with that country and then builds the ACL.  This one is probably not for the faint of heart nor someone not very fluent in Unix command lines.

A simpler way is through a website called Country IP Blocks.  Navigate to The Create Country ACL page on their site and you can select one or more countries to build an ACL for.  Then pick which format you want the results in.  Cisco ACL is just one of 12 options here, and then click "Create ACL" and you're done.  Other sites such as ipdeny.com and countryacl.tools.uebi.net provide similar functionality.

These lists get pretty long. Want one that that will permit or deny United States based addresses?  That'll be 55,348 lines.  Want to create an ACL that will block Russia and China?  That's 27,386 lines.  Hope your router is maxed out on RAM.
Share:

Wednesday, May 18, 2016

TCL Scripting

 on  with 2 comments 
In , ,  
According to it's man page, "tclsh is a shell-like application that reads TCL commands from its standard input or from a file and evaluates them. If invoked with no arguments then it runs interactively, reading TCL commands from standard input and printing command results and error messages to standard output. It runs until the exit command is invoked or until it reaches end-of-file on its standard input."  The TCL Developer Xchange describes the TCL language as  "a very powerful but easy to learn dynamic programming language, suitable for a very wide range of uses, including web and desktop applications, networking, administration, testing and many more. Open source and business-friendly, TCL is a mature yet evolving language that is truly cross platform, easily deployed and highly extensible. "

The language was created John Ousterhout at the University of California, Berkley.  It's either installed by default or available through the package repositories in nearly every Linux distribution and flavor of BSD.  ActiveState maintains an edition called ActiveTcl.  The community edition has precompiled binaries for Windows, Mac and Linux.  The Enterprise Edition adds binaries for HP-UX, Solaris and AIX.  ActiveState also the home of ActivePerl and ActivePython, which are solid editions of Perl and Python for the same platforms.

Tclsh was added to Cisco IOS in version 12.3(2)T and 12.2(25)S, and to Cisco NX-OS in Release 5.1(1) to provide scripting capability.  With it, you are able to run TCL commands directly from the Cisco IOS prompt, or to create and execute scripts written in the TCL language.  Just about anything you can do in tclsh on a Linux or BSD system can be done in tclsh on a Cisco router.  This of course assumes you're using straight TCL and not any add-on packages.

To use tclsh, simply type the command tclsh at the exec prompt.  To exit tclsh, type tclquit.  While within tclsh you can create scripts with the proc command, by typing proc script_name {, and then ending your script with a closing }.  A great example of the power of this scripting environment can be found in this post at INE, where Brian McGahan, along with an assist from reader Jason Cook, demonstrates a TCL script to generate a number of random IP addresses and subnet masks tied to Loopback interfaces.  I've used this script several times in the lab to quickly add routes into a routing protocol.  If you're feeling really adventurous, you can even get your router to Tweet.  And that's the beauty of scripting, you are able to quickly and easily automate the mundane tasks that aren't what you are working on and interested in, but still need accomplished.

And though it is not suggested, you can change your login shell on a Linux, BSD or Unix system to tclsh and do your day to day work in it as a means of learning the language and environment.  However, as noted, its not suggested as it's not really suited as being used a login script wasn't in the design goals.  See this article for more details.

I'll be getting more into TCL on IOS in the near future.

Some Good References to Get Started:

The official reference from Cisco:
Cisco IOS Scripting with TCL Command

The Cisco book:
Tcl Scripting for Cisco IOS

Some books that come recommended by the TCL Developer Exchange:

Practical Programming in Tcl and Tk, 4th ed.
Tcl/Tk, Second Edition: A Developer's Guide
Tcl and the Tk Toolkit, 2nd ed.
Tcl/Tk 8.5 Programming Cookbook
Share:

Saturday, May 14, 2016

Hard Code DNS Servers with PowerShell

 on  with No comments 
In , ,  
The following is a PowerShell script to quickly hard code DNS servers for every network interface present on a computer. It will overwrite the existing DNS servers configured on that machines interfaces.  In this example, we'll be using the IP addresses for OpenDNS servers.

# The servers that we want to use
$newDNSServers = "208.67.220.220","208.67.222.222"

# Get all network adapters that already have DNS servers set
$adapters = Get-WmiObject Win32_NetworkAdapterConfiguration | Where-Object {$_.DNSServerSearchOrder -ne $null}

# Set the DNS server search order for all of the previously-found adapters
$adapters | ForEach-Object {$_.SetDNSServerSearchOrder($newDNSServers)}
Share:

Thursday, May 12, 2016

Do the Google

 on  with 1 comment 
In , , ,  

It still surprises me that in 2016, there are still people out there who cannot, or will not, use Google to find the answer to their question.  I'm the admin of a large group on Facebook that exists primarily for people pursuing the CCNA certification, though most technical discussion that stays on the right side of the law is permitted.  Since we get at least one question a day that involves something that could be solved in 10 seconds with Google such as "what is the CCNA?" or "what is Spanning Tree?" I've decided to put together a page explaining how to use Google to find what you're looking for.  And for the Microsoft slappies out there, you are more than welcome to try that other "search engine" as long as you're enjoying it's crap results.  I for one very rarely got good results when I tried it a couple times in the past.

In case you were wondering, the title of this post, "Do the Google" came from a poster on Reddit by the name of /u/sajaschi, in the Tales from Tech Support sub-reddit, that he heard from a family member who's computer he supported.   I liked the term and immediately told him that I'm stealing it. The thread is here for completeness.
Share:

Wednesday, April 13, 2016

Resequencing an ACL

 on  with No comments 
In , ,  
Here's a quick post on a very useful command when working with ACLs.  I first heard about it while watching a CBT Nugget video, and I can say that it was definitely not covered in the NetAcad curriculum when I went through the classes, because I remember bringing it up to the instructor and it was news to him.

So let's begin by setting the scenerio.  You have the following ACL:

show ip access-list EXAMPLE

Extended IP access list EXAMPLE
    1 permit ip host 10.10.10.28 any
    2 permit ip host 10.10.10.10 any
    3 permit ip host 10.10.10.11 any
    4 permit ip host 10.10.10.45 any
    5 deny ip 10.10.10.0 0.0.0.255 any
    10 permit tcp any host 192.168.10.4 eq smtp

And let's say that we now need to allow one additional host out.  We could rewrite the ACL, but that could be a lot of work if its a long ACL.  Any other options?

Yes, the resequence command can help.  This command was introduced in IOS 12.2(14)S, and allows you to easily resequence an entire ACL.

ip access-list resequence EXAMPLE 10 10

This will renumber every line in the ACL starting with 10, and with an increment of 10 between each line.  This is the default sequencing for an access-list where no sequence numbers are entered.  The end result would be:

Extended IP access list EXAMPLE
    10 permit ip host 10.10.10.28 any
    20 permit ip host 10.10.10.10 any
    30 permit ip host 10.10.10.11 any
    40 permit ip host 10.10.10.45 any
    50 deny ip 10.10.10.0 0.0.0.255 any
    60 permit tcp any host 192.168.10.4 eq smtp

Old documenation will tell you that you can't edit a numbered ACL, but that's actually not true anymore.  
Share:

Wednesday, April 6, 2016

Reflexive ACLs on IOS Routers

 on  with No comments 
In , ,  
In a nutshell, reflexive ACLs allow packets to be evaluated based on upper layer session information. You use reflexive ACLs in order to permit the return traffic from an established session, but deny all other traffic in that direction.  For example, you open up a browser and establish an HTTPS session with www.awesomewebsite.com.  Now obviously, you want the return traffic from the server hosting awesomewebsite.com to make it back to you so you can see this awesome website.  But you also do not want malicious traffic trying to reach your workstation to come in with it.  A standard or extended ACL does not allow this, it's all or nothing.  But a reflexive ACL allows you to do exactly that, allow the return traffic from your session with awesomewebsite.com, but deny all other incoming traffic.  I've heard reflexive ACLs described as "a poor man's stateful firewall."

Cisco documentation points out that you can also configure it in the other direction.  You can, for example, allow all incoming traffic to a server in your DMZ, but only allow return traffic from that server to go back out to the Internet. In this example, external users would be able to view the content on your DMZ server, but it would mitigate the risk of your server becoming part of a botnet and eat up your upload bandwidth participating in a DDoS attack.  While possible, I doubt it's used very often.  So in the configuration example, we'll focus on the more common scenario.

So lets configure a reflexive ACL.  We'll start out with a basic ACL in the outbound direction which will allow all outbound traffic.  As typical, I'll use upper case letters for words and names I've created so they stand out as such when viewing show statements. 

ip access-list extended OUTBOUND
  permit ip any any reflect REFLECTED


And that's it.  In this ACL, we are allowing all outbound traffic. The difference here between this ACL and no ACL at all is the keyword reflect.  This tells the router to remember all traffic matched by the permit ip any any, and create a dynamic ACL for the return traffic that will be allowed.  But we're not limited to this single permit in the OUTBOUND ACL, we can combine that with any combination of permit and deny statements as needed.  Note that reflexive ACLs can only be used as part of extended named ACLs.   But other than that, you're pretty much only limited by your imagination.

ip access-list extended OUTBOUND
  permit tcp host 10.10.10.10 any eq smtp REFLECTED
  deny tcp any any eq smtp
  permit ip any any reflect REFLECTED


Here, we're denying outbound smtp except from a single host (the company email server), and then allowing all other traffic to go out reflected. Next, we'll create a basic ACL for the inbound direction.

ip access-list extended INBOUND
  evaluate REFLECTED


Again, we're not limited to just a single evaultate statement in this ACL either, we can add in any other needed statements allowed by a named ACL.

ip acess-list extended INBOUND
  evaluate REFLECTED
  permit any host 10.10.10.10 eq smtp
  permit any host 10.10.10.10 eq http


Now we just need to apply those lists to the outward facing interface of the router.

interface Ethernet 1/0
  ip access-group INBOUND in
  ip access-group OUTBOUND out


If you have multiple outward facing interfaces, you can apply these same ACLs to multiple interfaces and the same REFLECTED dynamic list will be maintained between them, shielding you from the side effects of asymmetric routing.  Now if Cisco would only give us a way to share the state of reflexive ACL's between different routers (one pointed at ISP1 and one pointed at ISP2 for example), then we'd be all set.

interface Ethernet 1/0
  ip access-group INBOUND in
  ip access-group OUTBOUND out
!
interface Ethernet 1/1
  ip access-group INBOUND in
  ip access-group OUTBOUND out


Share:

Wednesday, March 30, 2016

Installing NDES on the Issuing CA

 on  with No comments 
In , ,  
The Network Device Enrollment Service (better known as NDES) is a component of Active Directory Certificate Services.  It's based on the industry standard Simple Certificate Enrollment Protocol (SCEP) which is an Internet Draft by the Internet Engineering Task Force (IETF).  SCEP is designed to make digital certificate issuance as simple and scaleable as possible.  SCEP can be used to distribute certificates to network devices such as routers and firewalls, as well as mobile devices such as cellphones.

In this post, we'll go through the installation of NDES on the issuing CA.  There won't be many screenshots this time around since we've already seen pretty much everything installing the Active Directory Certificate Services role on both CAs. Note that I'll be using the domain name of firewallninja.info throughout.  Substitute the name of your domain as appropriate.

First, we need to add a service account.  On the domain controller, launch Active Directory Users and Computers (ADUC) from the Administrative Tools program group.  On the left side of the screen, you'll see the OU hierarchy for your domain. Right click on firewallnina.info and create a new OU called Admins.  Inside the Admins OU, create another OU called Service Identities.  Right Click on Service Identities and select new and then user.  Give this user the username of NDESService and a firstname of whatever (you have to give the user either a first name or last name in addition to a username), and on the next screen a password that you'll be able to remember. Uncheck User Must Change Password at Next Login and select Password Never Expires. Finish off the wizard to create the user. It will look as follows when you are done.


Now go back to the issuing CA.  Launch Computer Management from the Administrative Tools program group.  Expand out Local Users and Groups, and then Groups on the left side.  Double Click IIS_IUSRS, and then click Add.  In the search box that comes up, enter NDESService, and press OK.  Press OK on the IIS_IUSRS properties, And then close Computer Management.

Now in Server Manager, Select Add Roles and Features. 
  • Hit Next a couple times until you get to the Server Roles screen.  
  • Expand out Active Directory Certificate Services and check the box next to Network Device Enrollment Service. 
  • OK additional pieces of IIS to install.  
  • On the Specify User Account page, click Select User and enter the NDESService user and its password. 
  • On the Specify Registration Authority Information page, give a name for the NDES service (different than that given for the issuing CA) and select a country from the drop down list.  The rest can be left blank.  
  • On the Configure Cryptography screen, choose the settings that you used for the Root CA and Issuing CA.
  • Review the information about IIS and hit next.
  • Review the Confirm Installation Services page and hit next.
  • Install NDES.
NDES has now been installed on the issuing CA and is ready to use.  We've now completed the setup of the issuing CA.


Share:

Saturday, March 26, 2016

Backup Your Blog on Blogger

 on  with No comments 
In ,  
Here's a little quick and dirty post on backing up your blog on Blogger since every howto that I have seen online is a bit dated and things have moved.   But that's to be expected, things are always moving when it comes to Google.  Like all things in IT, you should make a regular backup of your blog just in case you have an oopsie, or Google determines you have violated their terms and shuts you down.

In your Blogger control panel, go into the settings for the blog you want to back up.  On the left side of the page, you'll see Settings at the bottom of the list of categories.  Click on Settings, then at the bottom of the Settings submenu, you'll see Other.  Click on Other, and at the top of the page you'll see "Import & back up."  Click the button labeled "Back up Content," and you'll be presented a save as dialog box which will let you save a single .xml file with all of your blog's settings and posts.  If you examine the outputted .xml file, you'll find everything there.  Should you wish to move your site do a different platform in the future, many platforms will be able to import this .xml file directly.
Share:

Wednesday, March 23, 2016

Research Results

 on  with No comments 
In , ,  
Our survey was posted online for a period of one week. Following this period, data was pulled down from SurveyMonkey in the form of a Microsoft Excel spreadsheet. Survey results were converted from text to numeric answers. All statistical analysis was conducted in IBM SPSS v23 for Linux on the OpenSUSE Leap 42.1 operating system.

Share:

Building the Issuing CA

 on  with No comments 
In , ,  
In the last post, we went through building the root CA which followed building the domain and generating a mess of test users.  Moving along this time, we're going to start building the issuing CA for the domain and for our network devices.  Once we get through this stage, the root CA can be powered down, and moved to long term permanent storage if necessary.

Once again, I'll be using the The 70-640 Self-Paced Training Kit from Microsoft Press as my guide, though the MCTS 70-640 Cert Guide from Pearson will work as well.  I actually prefer the Pearson book as it feels more in depth and complete than the Microsoft Press book.

First, ensure that the root CA and issuing CA are both running. Log into the issuing CA with an administrator account.  As with the root CA, you can use a local administrator on the issuing CA, but a domain administrator will be fine as well.  And unlike the root CA, if you are using Server 2008 or 2008R2 for the issuing CA, it needs to be Enterprise or Data Center Edition.  For Server 2012 and up, Standard Edition will be sufficient.

I'm really liking the decision now to go with Server 2008R2 for the root CA ,Server 2012R2 for the issuing CA, and Server 2016 for the domain controller.  The contrasting appearances of windows in the three operating systems really helps to make it clear which server is which in the screen shots.

Enough of the small talk, let's get started.  Launch Server Manager if it is not already running.  As with setting up the domain controller, start by selecting add roles and features.


Select the local server from the list if it is not the only one, just proceed if it is.


Select Certificate Authority from the list, and accept the prerequisite roles and features to be added.


There won't be any additional features to add, so just Next your way through.


Now options for the CA role appear.


Here we'll select Certificate Authority and Online Responder.  We'll be adding NDES later. With 2008 and 2008R2, you couldn't install NDES at the same time as any other CA role.  I don't recall if that is true still for 2012R2, but I'll just go with what I know here.


We'll have the options to configure IIS next.


The necessary IIS bits will be preselected, add any thing else you may want.


We're now at the confirmation screen where you get one last chance to go back.  Hit install whenever you're ready.


Everything selected will install.


Once the installation is complete, you'll find yourself back at Server Manager.  If you click on AD CS on the left, you'll notice that additional configuration for the AD CS role is required.  On the yellow bar, first click More, then configure.


Here is a dialog box giving you information about what needs to be done.  Click Configure again.


First, you will need to provide credentials. Give the currently logged in user, or provide a username/password for a different user.


Select both Certification Authority and Online Responder to configure.


Select Enterprise CA.  If you don't have the right edition of Windows Server, this option will be grayed out.


Next, select subordinate CA.


Create a new key.

Select your cryptography options.  I went with all the same options as before.  You can lower the strength if resources are at a premium.


 Here we'll name the CA.  Again, this is not the same as the server's hostname.  The defaults are fine.


Here we'll specify that we want to get a certificate from our root CA.  Click the radio button next to Send a certificate request to a parent CA, and then hit the Select button and choose the root CA.


Here's where the data files will live for the CA. The defaults are fine for a lab server.


Confirmation of your settings.


 Finish up the wizard and allow the configuration to take place.


Now, create a file share somewhere on the issue CA.  You'll be copying your cert to this share from the root CA later.  If you need a refresh on creating a share, Technet has you covered.

Finally when it is done configuring, you're ready to bring the issuing CA online.  Go back to the root CA and load the Certification Authority mmc.  In the Pending Requests folder, you'll see the request from the issuing CA.  Right click on this request and select issue.


Now you'll see that the cert has moved from Pending Requests to Issued Certificates.


Right click on it again and export the cert.  Once you have it on the HDD, move it to the file share on the issuing CA. For some reason on mine, it saved with a long random name with .tmp as the extension, but it worked.


Back at the issuing CA, right click on the server name and select All tasks, Import.  If you got a .tmp file as well, you'll have to change file type to All Files in the open dialog box.

You'll notice that there really isn't much difference in the layout and functionality of the CA mmc on the two different operating systems.  When you really dig in, there will be additional features in 2012R2, but other than that it's minimal and cosmetic.


With the certificate installed, you'll finally be able to start up the Certification Authority service.  From the CA mmc, right click on the server and select All tasks, start service.


Now that your issuing CA is up and running, wait through another group policy update cycle (roughly 90 minutes) and then you can shut down your root CA.  

Note that the issuing CA will not appear in the Certification Authorities container in Active directory as the root CA did.  Instead, check the Enrollment Services Container, which contains all CAs for Active Directory, not just the root CA.  For the purpose of this post, verification of the issuing CA is enough, but if you care to know more about the matter, you can find some great information on Technet.  I'll certainly cover more in depth information like this as my work in the lab gets to it.


The last step here is to install and configure the NDES service on the issuing CA, but this post is long enough so I'll save that for another post. 

Share:

Saturday, March 19, 2016

Building the Root CA

 on  with No comments 
In , , ,  
In the lab, a single Windows Server running Active Directory and Active Directory Certificate Services.  But if you haven't figured out yet, I am a big fan of overkill and never do anything only to the level of minimum required.  I always like to do everything bigger and better, as there will be additional opportunities to learn that way.  I'm using The 70-640 Self-Paced Training Kit as a guide, one of the two books that I used years ago when I was studying for the MCSA 2008.  I actually liked the Pearson book by Don Poulton better, but the Microsoft Press book is sufficient, even if it is a bit thin in the details.

In a previous post, I created a domain with the name firewallninja.info on a server with Windows Server 2016 Technical Preview 4.  Today we'll continue building out the security lab by adding the first of a 2 tier CA hierarchy, the root CA.  I have previously built a VM with Server 2008R2, configured its hostname and IPv4 settings, and added it to the firewallninja.info domain.  If you need a refresher on adding a new server to your domain, here is a guide for Server 2003 and 2008 and here is a guide for Server 2012R2.  For the root CA, Windows Server 2008R2 Standard, Enterprise or Datacenter Edition can be used.

I selected to go with Server 2008R2 rather than going 2012R2 for both CAs for a couple of reasons.   First, when I had an MSDN account though school years back, I build a large volume of Server 2008R2 VMs and haven't used even a fraction of them yet.  And I probably won't, seeing as most of the labbing I do is on Server 2012R2 at this point.  This is a root CA that is going to be powered down and I'll probably never see it again, so why not.  Second, there are a few slight differences when working with 2008R2 and 2012R2, so I wanted to run through it on both for the sake of exposure.  Server 2008R2 is still out there, probably still in higher numbers than 2012R2 at this point.  I don't recall the root CA requiring any specific version of Windows Server to use the latest/greatest features on the issuing CA, so Server 2000 or 2003, or even Linux with OpenSSL may be sufficient as well.

So let's get started on the root CA.  Log into the server with an administrator account.  A local admin account is sufficient, but you can use a domain admin account as well.  Let the Server Manager load as that's the tool we'll be using.


On the left pane of Server Manager, find Roles and click on it.  On my server, nothing has been installed yet, so the box is blank and says 0 of 17.   Click on Add roles on the right.


Next, select Active Directory Certificate Services.  If you want to add any other server roles, you can select them as well.


Once you have selected Active Directory Certificate Services, you'll see the box change to include options for the role, or roles, that you have selected.


For this server, I'm only going to install Certificate Authority.  The others will be used on the issuing CA later.


Next, I'm going to select Standalone.  The difference is beyond the scope of this post, but you can read more about this at Technet, if you're interested.


Here I'm going to select Root CA.


Next, I'm going to have the server create a new private key.  Since this is a new setup, I don't have an existing key to give it.  If you were replacing a server that died and are fortunate enough to have the private key from that server, you can import it here.  Another reason why you would import a certificate here would be if you purchased one from a 3rd party CA such as GoDaddy.


I'm going to keep the default 2048 bit key, and I'm going to use SHA256.  Modern web browsers are either flat out dropping support for SHA1, or making it difficult to enable, so you should be thinking about that when configuring cryptography in your CAs.  The last option on the page, "Allow administrator interaction when the private key is accessed by the CA" is an additional security control that requires an admin user to interact with the CA.


Next, we'll choose the distinguished name for this CA.  This is not the same as the server's hostname, but can be.


I'm changing the lifetime of the certificate to 20 years.  This is a lab, and I don't want to have to worry about my cert expiring and then finding that the root CA that's been offline for 5 years doesn't want to boot up.  With any luck, I won't still be using this domain in 20 years.


Give the location on the filesystem for the CA data.  Like the AD data, the defaults are fine in the lab, but you'll want to spread the love around multiple spindles if possible in production.


Review your choices here, or don't, and then click Install.


Go grab a cup of coffee and/or a snack. This takes a few minutes, especially in a VM.


Finally, everything is installed and we're ready to go.


Back at the Server Manager, you can view the results of the installation.  For instance, in the events, you should see event 103 which indicates that your CA name has been added to the Certificate Authorities container in Active Directory.

After the next group policy cycle, you can move on to the issuing CA.  Now if we go back to the domain controller and dig down in ADSIEdit, we can see the root CA in the Active Directory schema.  The root CA can go offline once the issuing CA has its cert.


With the root server in AD and powered down, we will only ever need it again at such time that we need to generate a new root certificate.  Next up, the issuing CA.
Share: